

Alligator Hunting: A One of a Kind Experience -
Why They Call it Hunting Instead of Killing -
Florida's Other Crab - by Kris Thoemke
The Waiting Game - by Kris Thoemke
Mounted Memories - by Kris Thoemke
Eco-Touring in Collier County - by Kris Thoemke
Beyond the Largemouth Bass - by Kris Thoemke
Tying One On -- Some thoughts on how to get started tying your own flies -- by Kris Thoemke
The Big Cypress: Adventures in a Vast Wilderness
Four Strokes on the Water -- The sound of the future for marine outboards is likely to be much quieter --
Birding Big Cypress Swamp and the 10,000 Islands --
Recycling Your Fish -- by Kris Thoemke
Peace, Paddle and Hunt -- by Kris Thoemke
by Kris Thoemke
by Kris Thoemke
-- Kris Thoemke spends the day exploring the Big Cypress National Preserve with Preserve biologist Debra Jansen
by Kris Thoemke
by natural history writer and photographer Jeff Ripple
A Basic Guide to Saltwater Fly Fishing in Southwest Florida
C 1996, Don Phillips
Chapter 6 - Knots for Fly Fishing
From the preceding chapter you can see that there are a lot of "connections" that need to be made between the reel and the fly. All of these connections or knots need to be considered as a potential sources for separation when a large saltwater gamefish has grabbed your fly. If a knot breaks or slips you will not land the fish; you may lose some expensive stuff and the fish may not survive due to entanglement of trailing line. And so, knots are important.
Fortunately, standard fly tackle is designed so that the weakest link should be at the point of the
leader, or where its diameter is at its minimum. Accordingly, a breakaway fish usually only takes
with him a fly and perhaps a foot or so of shock tippet. A bad knot between the fly line and the
backing line could however break or slip far below its 20 to 30 pound (100%) rating and thus
become the weak link. This doesn't necessarily mean that you need a 100% or even a 95% knot,
if using a 15 pound leader point. What you don't want is a 40-60% knot under these
circumstances. And so, my recommendation is that you use knots that are easy to tie, that are
smooth in contour and that have an adequate % strength considering the strength of the rest of the
line connections. The following paragraphs describe and depict the knots that I recommend for
southwest Florida fly fishing. For this chapter I am indebted to the superb sketches inTom McNally's book, Fly Fishing (1978).

Let's start at the reel arbor, where the backing line is attached. The Arbor Jam Knot is formed
by bringing the backing line around the reel arbor, tying a loose overhand knot around the
standing line and then tying a tight overhand knot at the line end. Cut off all but about 1/8 inch
from the tight overhand knot and then position and partially tighten the loose overhand knot until
it is adjacent to the tight knot and snugly around the standing line. Then, pull the standing line
and the two overhand knots will slide down to the arbor, the line-end knot jamming against the
other knot and the reel arbor. For added insurance that this knot will not slip, grab the 1/8 inch
loose end with needlenose pliers and pull sharply. Then pull the standing line again, resetting the
jam knot.
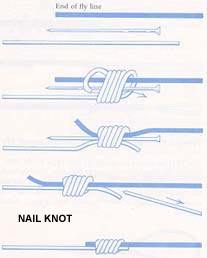
For joining the backing line to the end of the fly line I use the Nail Knot. Per the sketch, place
the two lines and the nail so that they are parallel, with plenty of extra backing line extended.
Grasping the whole assemblage between the thumb and index finger of one hand, reverse the
direction of the backing line end and wrap it around the fly line, nail and itself in smooth spirals
6-8 times. Then hold the entire assembly with the thumb and index finger of the opposite hand
and slide the end of the backing line under the spirals, adjacent to the nail. When the backing
line end has exited the spirals, tug on both ends of the backing line alternately until you can feel
that the backing line has tightened securely around the fly line. Now, slide the nail out and snug
the backing line again by alternately pulling at both ends. Then, grab the backing line end with a
pair of pliers and grab the standing end of the backing line with your hand, tightening the knot as
much as you can. Release the pliers and use that free hand to grab the fly line and again pull as
hard as you can. The knot is now set and all that's remaining is to trim both loose ends as close
to the knot as practical. If the backing line spirals have neatly nested around the fly line, you
will have a very smooth knot that is not likely to get caught when being pulled out or reeled
through the rod's line guides. This knot is much easier to tie if you replace the nail with a small-diameter tube (or something like an air pump needle with the end cut off), inserting the end of the
backing line through the tube instead of adjacent to it.
I almost always use the nail knot also to join the fly line to the leader, since it creates a nice stiff
and smooth connection. There are circumstances however where frequent leader changes are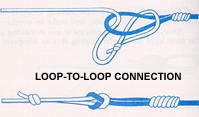 anticipated and here many anglers prefer to make a Loop-to-Loop Connection, simply because
it's much faster to make these changes. Some leaders and lines are sold with end loops already
attached, but you can easily make your own. To make a neat loop in a fly line point, set up as
above for a nail knot except make a small loop at the end of the fly line. The backing line (or
other strong, limp substitute) is thus wrapped around the nail, the backing line, and 2 sections of
the fly line. After the usual tightening, simply cut off both ends of the backing line and the short
end of the fly line. Another method which results in an even smoother connection is to dissolve
the coating from about 4 inches of end of the fly line (with acetone or nail polish remover) and
anticipated and here many anglers prefer to make a Loop-to-Loop Connection, simply because
it's much faster to make these changes. Some leaders and lines are sold with end loops already
attached, but you can easily make your own. To make a neat loop in a fly line point, set up as
above for a nail knot except make a small loop at the end of the fly line. The backing line (or
other strong, limp substitute) is thus wrapped around the nail, the backing line, and 2 sections of
the fly line. After the usual tightening, simply cut off both ends of the backing line and the short
end of the fly line. Another method which results in an even smoother connection is to dissolve
the coating from about 4 inches of end of the fly line (with acetone or nail polish remover) and![]() use a needle to thread the line core back under the coating for a distance of about one inch. Then
bring the line core back out through the coating surface until you have a core loop of the correct
size. From this point on, tie a nail knot per the preceding paragraph. I find that the best way to
tie a loop at the end of the leader butt is to use the Surgeon's Loop. This is really just a double-overhand knot in a looped-end.
use a needle to thread the line core back under the coating for a distance of about one inch. Then
bring the line core back out through the coating surface until you have a core loop of the correct
size. From this point on, tie a nail knot per the preceding paragraph. I find that the best way to
tie a loop at the end of the leader butt is to use the Surgeon's Loop. This is really just a double-overhand knot in a looped-end.
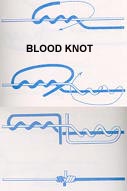 If you tie your own leader by using sections of constant-diameter monofilament, these sections
are usually joined using a Blood Knot. When adjacent sections of monofilament are of
significantly-different diameters, the blood knot is somewhat difficult to tie because the thick
section doesn't want to spiral around the thin section. Although this can be often helped by
doubling over the thin section to a double-strand, I find this to be hard to handle. In this
If you tie your own leader by using sections of constant-diameter monofilament, these sections
are usually joined using a Blood Knot. When adjacent sections of monofilament are of
significantly-different diameters, the blood knot is somewhat difficult to tie because the thick
section doesn't want to spiral around the thin section. Although this can be often helped by
doubling over the thin section to a double-strand, I find this to be hard to handle. In this![]() situation, I prefer the Surgeon's Knot which, although it's a bulkier knot, has about a 95%
strength rating. I also use the surgeon's knot to connect the leader point to a much heavier shock
tippet.
situation, I prefer the Surgeon's Knot which, although it's a bulkier knot, has about a 95%
strength rating. I also use the surgeon's knot to connect the leader point to a much heavier shock
tippet.
If using a leader of 8-15 pounds test without a shock tippet, I'll usually tie the leader point to the fly using the Improved Clinch Knot. With small flies (sizes 6, 8, etc.)however this connection
may be a little stiff to permit a fly to freely wiggle from side-to-side during retrieval. In this
instance I use the Loop Knot. There are several very adequate loop knots
  used, but I use the one
recommended by Doug Swisher and Bob Marvin, two of the pioneers in saltwater fly fishing here
in southwest Florida. The loop knot is also used whenever shock tippets are employed, again
because of the tendency of the relatively stiff monofilament to impair the action of the fly when
solidly tied to the hook eye. When fishing a foam or cork popper or slider with a heavy shock
tippet, I usually go back to the improved clinch knot, believing that this type of "fly" has
sufficient action of its own to not be inhibited by a stiff tippet. As usual, judgement should
prevail when selecting tackle alternatives, to fit your particular fishing conditions.
 Personally, I don't participate in tournaments nor go after IGFA records. Those anglers who do,
however, use some other knots which test out somewhat closer to the 100% level. One of theseknots is the Albright Special Knot, used to join two sections of monofilament of quite different
diameters. It is sometimes preferred over the surgeon's knot because it is easier to fully tighten
without compromising the strength of the smaller line. To obtain the highest strength rating for a
loop-end, anglers world-wide prefer either the Bimini Twist or the
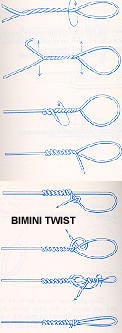
 Spider Hitch . Both of these
knots rely on double-stranding for the knot itself, almost guaranteeing 100% of single-strand
strength. The bimini twist is an easy knot to illustrate but very tedious to describe. On the other
hand, the spider hitch is hard to illustrate and yet easy to describe. Referring to the spider hitch
sketch, after doubling over the end and making an interim loop with it, wrap the doubled line
around your thumbnail and the interim loop about 5 or 6 times. Then, pass the end loop through
the interim loop and slowly pull the end loop so that the line unwinds off the thumbnail and
tightens the knot. I'll let you figure out the bimini twist yourself.
There are some general rules of knot-tying which I follow and which I heartily recommend.
First, use your saliva to lubricate your monofilament knots before snugging them up tight. If a
knot isn't really tight, it probably will loosen later in service. When you tighten the knot, pull
hard enough to get up to at least half of its expected breaking strength. This tests the integrity of
your knot and might tell you when an unseen cut or abrasion has weakened it substantially. And
if the line breaks 2 or 3 times in a row when you do this, you will know that it's time to throw
away that particular leader or spool of monofilament. Unlike wine, nylon monofilament does not
improve with age. Also, clip off the loose ends as close as possible to the knot so as to minimize
the chances of catching on the rod guides, seagrass, etc. Finally, for those knots that you are able
to tie at home, add a drop of super-glue to guarantee maximum strength and add a coating or two
of Pliobond (rubber cement) to smooth out knot contours. Such steps will pay off handsomely
when your gear is pushed to the limit by "the big one".
When fly fishing for mackerel or barracuda, it is wise to construct a shock tippet from braided
stainless steel wire. Sometimes this is sold pre-impregnated with a plastic coating. If you're
equipped with metal sleeves and crimping tools, you can simply make loops as you need them for
the fly and the leader ends. If you don't want to carry this stuff on the water, you can put loops![]() on one end (for the leader connection) at home and use the Figure-Eight Knot on the water for
the fly connection. You might be fishing with a conventional leader and suddenly come upon the
opportunity to cast at a big barracuda. Here's a little tip I learned in the Bahamas. Keep a few
stainless steel leaders in your tackle box with snap swivels on one end (for the barracuda fly) and
a double-sleeved loop on the other end. The sleeve closest to the loop end is only partially
crimped, so it slides (with a little force) toward the loop end. In an instant, you can put your
barracuda fly on the snap swivel-end, put the loop on the other end of the leader over the barbed
hook point of the fly you are currently using, and coax the loop closed over the hook shank with
the sliding sleeve. Voila, you're ready to go after old scissor-jaws! These latter thoughts aren't
all really "knots", but they are connections that help you hold your tackle together.
on one end (for the leader connection) at home and use the Figure-Eight Knot on the water for
the fly connection. You might be fishing with a conventional leader and suddenly come upon the
opportunity to cast at a big barracuda. Here's a little tip I learned in the Bahamas. Keep a few
stainless steel leaders in your tackle box with snap swivels on one end (for the barracuda fly) and
a double-sleeved loop on the other end. The sleeve closest to the loop end is only partially
crimped, so it slides (with a little force) toward the loop end. In an instant, you can put your
barracuda fly on the snap swivel-end, put the loop on the other end of the leader over the barbed
hook point of the fly you are currently using, and coax the loop closed over the hook shank with
the sliding sleeve. Voila, you're ready to go after old scissor-jaws! These latter thoughts aren't
all really "knots", but they are connections that help you hold your tackle together.
Next Article - Flies & Fly-Tying
Table of Contents


